A powerful development environment for Java-based programming is Eclipse. Eclipse is a free, open-source IDE. It supports multiple languages through a plugin interface, with special attention paid to Java. Tools designed for working with Hadoop can be integrated into Eclipse, making it an attractive platform for Hadoop development. In this section we will review how to obtain, configure, and use Eclipse.
Downloading and Installing
Note: The most current release of Eclipse is called Ganymede. Our testing shows that Ganymede is currently incompatible with the Hadoop MapReduce plugin. The most recent version which worked properly with the Hadoop plugin is version 3.3.1, "Europa." To download Europa, do not visit the main Eclipse website; it can be found in the archive site http://archive.eclipse.org/eclipse/downloads/ as the "Archived Release (3.3.1)."
The Eclipse website has several versions available for download; choose either "Eclipse Classic" or "Eclipse IDE for Java Developers."
Because it is written in Java, Eclipse is very cross-platform. Eclipse is available for Windows, Linux, and Mac OSX.
Installing Eclipse is very straightforward. Eclipse is packaged as a .zip file. Windows itself can natively unzip the compressed file into a directory. If you encounter errors using the Windows decompression tool (see [1]), try using a third-party unzip utility such as 7-zip or WinRAR.
After you have decompressed Eclipse into a directory, you can run it straight from that directory with no modifications or other "installation" procedure. You may want to move it into C:\Program Files\Eclipse to keep consistent with your other applications, but it can reside in the Desktop or elsewhere as well.
Installing the Hadoop MapReduce Plugin
Hadoop comes with a plugin for Eclipse that makes developing MapReduce programs easier. In the hadoop-0.18.0/contrib/eclipse-plugin directory on this CD, you will find a file named hadoop-0.18.0-eclipse-plugin.jar. Copy this into the plugins/ subdirectory of wherever you unzipped Eclipse.
Making a Copy of Hadoop
While we will be running MapReduce programs on the virtual machine, we will be compiling them on the host machine. The host therefore needs a copy of the Hadoop jars to compile your code against. Copy the /hadoop-0.18.0 directory from the CD into a location on your local drive, and remember where this is. You do not need to configure this copy of Hadoop in any way.
Running Eclipse
Navigate into the Eclipse directory and run eclipse.exe to start the IDE. Eclipse stores all of your source projects and their related settings in a directory called a workspace.
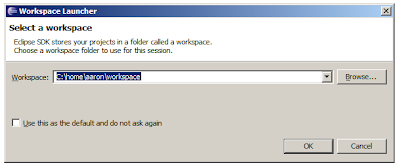
Upon starting Eclipse, it will prompt you for a directory to act as the workspace. Choose a directory name that makes sense to you and click OK.
eclipse-workspace
Configuring the MapReduce Plugin
In this section, we will walk through the process of configuring Eclipse to switch to the MapReduce perspective and connect to the Hadoop virtual machine.
Step 1: If you have not already done so, start Eclipse and choose a workspace directory. If you are presented with a "welcome" screen, click the button that says "Go to the Workbench." The Workbench is the main view of Eclipse, where you can write source code, launch programs, and manage your projects.
Step 2: Start the virtual machine. Double-click on the image.vmx file in the virtual machine's installation directory to launch the virtual machine. It should begin the Linux boot process.
Step 3: Switch to the MapReduce perspective. In the upper-right corner of the workbench, click the "Open Perspective" button, as shown in Figure 3.4:
Select "Other," followed by "Map/Reduce" in the window that opens up. At first, nothing may appear to change. In the menu, choose Window * Show View * Other. Under "MapReduce Tools," select "Map/Reduce Locations." This should make a new panel visible at the bottom of the screen, next to Problems and Tasks.
Step 4: Add the Server. In the Map/Reduce Locations panel, click on the elephant logo in the upper-right corner to add a new server to Eclipse.
You will now be asked to fill in a number of parameters identifying the server. To connect to the VMware image, the values are:
Location name: (Any descriptive name you want; e.g., "VMware server")
Map/Reduce Master Host: (The IP address printed at startup)
Map/Reduce Master Port: 9001
DFS Master Port: 9000
User name: hadoop-user
Next, click on the "Advanced" tab. There are two settings here which must be changed.
Scroll down to hadoop.job.ugi. It contains your current Windows login credentials. Highlight the first comma-separated value in this list (your username) and replace it with hadoop-user.
Next, scroll further down to mapred.system.dir. Erase the current value and set it to /hadoop/mapred/system.
When you are done, click "Finish." Your server will now appear in the Map/Reduce Locations panel. If you look in the Project Explorer (upper-left corner of Eclipse), you will see that the MapReduce plugin has added the ability to browse HDFS. Click the [+] buttons to expand the directory tree to see any files already there. If you inserted files into HDFS yourself, they will be visible in this tree.
Downloading and Installing
Note: The most current release of Eclipse is called Ganymede. Our testing shows that Ganymede is currently incompatible with the Hadoop MapReduce plugin. The most recent version which worked properly with the Hadoop plugin is version 3.3.1, "Europa." To download Europa, do not visit the main Eclipse website; it can be found in the archive site http://archive.eclipse.org/eclipse/downloads/ as the "Archived Release (3.3.1)."
The Eclipse website has several versions available for download; choose either "Eclipse Classic" or "Eclipse IDE for Java Developers."
Because it is written in Java, Eclipse is very cross-platform. Eclipse is available for Windows, Linux, and Mac OSX.
Installing Eclipse is very straightforward. Eclipse is packaged as a .zip file. Windows itself can natively unzip the compressed file into a directory. If you encounter errors using the Windows decompression tool (see [1]), try using a third-party unzip utility such as 7-zip or WinRAR.
After you have decompressed Eclipse into a directory, you can run it straight from that directory with no modifications or other "installation" procedure. You may want to move it into C:\Program Files\Eclipse to keep consistent with your other applications, but it can reside in the Desktop or elsewhere as well.
Installing the Hadoop MapReduce Plugin
Hadoop comes with a plugin for Eclipse that makes developing MapReduce programs easier. In the hadoop-0.18.0/contrib/eclipse-plugin directory on this CD, you will find a file named hadoop-0.18.0-eclipse-plugin.jar. Copy this into the plugins/ subdirectory of wherever you unzipped Eclipse.
Making a Copy of Hadoop
While we will be running MapReduce programs on the virtual machine, we will be compiling them on the host machine. The host therefore needs a copy of the Hadoop jars to compile your code against. Copy the /hadoop-0.18.0 directory from the CD into a location on your local drive, and remember where this is. You do not need to configure this copy of Hadoop in any way.
Running Eclipse
Navigate into the Eclipse directory and run eclipse.exe to start the IDE. Eclipse stores all of your source projects and their related settings in a directory called a workspace.
Upon starting Eclipse, it will prompt you for a directory to act as the workspace. Choose a directory name that makes sense to you and click OK.
eclipse-workspace

Configuring the MapReduce Plugin
In this section, we will walk through the process of configuring Eclipse to switch to the MapReduce perspective and connect to the Hadoop virtual machine.
Step 1: If you have not already done so, start Eclipse and choose a workspace directory. If you are presented with a "welcome" screen, click the button that says "Go to the Workbench." The Workbench is the main view of Eclipse, where you can write source code, launch programs, and manage your projects.
Step 2: Start the virtual machine. Double-click on the image.vmx file in the virtual machine's installation directory to launch the virtual machine. It should begin the Linux boot process.
Step 3: Switch to the MapReduce perspective. In the upper-right corner of the workbench, click the "Open Perspective" button, as shown in Figure 3.4:
Select "Other," followed by "Map/Reduce" in the window that opens up. At first, nothing may appear to change. In the menu, choose Window * Show View * Other. Under "MapReduce Tools," select "Map/Reduce Locations." This should make a new panel visible at the bottom of the screen, next to Problems and Tasks.
Step 4: Add the Server. In the Map/Reduce Locations panel, click on the elephant logo in the upper-right corner to add a new server to Eclipse.
You will now be asked to fill in a number of parameters identifying the server. To connect to the VMware image, the values are:
Location name: (Any descriptive name you want; e.g., "VMware server")
Map/Reduce Master Host: (The IP address printed at startup)
Map/Reduce Master Port: 9001
DFS Master Port: 9000
User name: hadoop-user
Next, click on the "Advanced" tab. There are two settings here which must be changed.
Scroll down to hadoop.job.ugi. It contains your current Windows login credentials. Highlight the first comma-separated value in this list (your username) and replace it with hadoop-user.
Next, scroll further down to mapred.system.dir. Erase the current value and set it to /hadoop/mapred/system.
When you are done, click "Finish." Your server will now appear in the Map/Reduce Locations panel. If you look in the Project Explorer (upper-left corner of Eclipse), you will see that the MapReduce plugin has added the ability to browse HDFS. Click the [+] buttons to expand the directory tree to see any files already there. If you inserted files into HDFS yourself, they will be visible in this tree.
