HDFS exposes a web server which is capable of performing basic status monitoring and file browsing operations. By default this is exposed on port 50070 on the NameNode. Accessing http://namenode:50070/ with a web browser will return a page containing overview information about the health, capacity, and usage of the cluster (similar to the information returned by bin/hadoop dfsadmin -report).
The address and port where the web interface listens can be changed by setting dfs.http.address in conf/hadoop-site.xml. It must be of the form address:port. To accept requests on all addresses, use 0.0.0.0.
From this interface, you can browse HDFS itself with a basic file-browser interface. Each DataNode exposes its file browser interface on port 50075. You can override this by setting the dfs.datanode.http.address configuration key to a setting other than 0.0.0.0:50075. Log files generated by the Hadoop daemons can be accessed through this interface, which is useful for distributed debugging and troubleshooting.
Showing posts with label HDFS. Show all posts
Showing posts with label HDFS. Show all posts

Rack Awareness
For small clusters in which all servers are connected by a single switch, there are only two levels of locality: "on-machine" and "off-machine." When loading data from a DataNode's local drive into HDFS, the NameNode will schedule one copy to go into the local DataNode, and will pick two other machines at random from the cluster.
For larger Hadoop installations which span multiple racks, it is important to ensure that replicas of data exist on multiple racks. This way, the loss of a switch does not render portions of the data unavailable due to all replicas being underneath it.
HDFS can be made rack-aware by the use of a script which allows the master node to map the network topology of the cluster. While alternate configuration strategies can be used, the default implementation allows you to provide an executable script which returns the "rack address" of each of a list of IP addresses.
The network topology script receives as arguments one or more IP addresses of nodes in the cluster. It returns on stdout a list of rack names, one for each input. The input and output order must be consistent.
To set the rack mapping script, specify the key topology.script.file.name in conf/hadoop-site.xml. This provides a command to run to return a rack id; it must be an executable script or program. By default, Hadoop will attempt to send a set of IP addresses to the file as several separate command line arguments. You can control the maximum acceptable number of arguments with the topology.script.number.args key.
Rack ids in Hadoop are hierarchical and look like path names. By default, every node has a rack id of /default-rack. You can set rack ids for nodes to any arbitrary path, e.g., /foo/bar-rack. Path elements further to the left are higher up the tree. Thus a reasonable structure for a large installation may be /top-switch-name/rack-name.
Hadoop rack ids are not currently expressive enough to handle an unusual routing topology such as a 3-d torus; they assume that each node is connected to a single switch which in turn has a single upstream switch. This is not usually a problem, however. Actual packet routing will be directed using the topology discovered by or set in switches and routers. The Hadoop rack ids will be used to find "near" and "far" nodes for replica placement (and in 0.17, MapReduce task placement).
The following example script performs rack identification based on IP addresses given a hierarchical IP addressing scheme enforced by the network administrator. This may work directly for simple installations; more complex network configurations may require a file- or table-based lookup process. Care should be taken in that case to keep the table up-to-date as nodes are physically relocated, etc. This script requires that the maximum number of arguments be set to 1.
#!/bin/bash
# Set rack id based on IP address.
# Assumes network administrator has complete control
# over IP addresses assigned to nodes and they are
# in the 10.x.y.z address space. Assumes that
# IP addresses are distributed hierarchically. e.g.,
# 10.1.y.z is one data center segment and 10.2.y.z is another;
# 10.1.1.z is one rack, 10.1.2.z is another rack in
# the same segment, etc.)
#
# This is invoked with an IP address as its only argument
# get IP address from the input
ipaddr=$0
# select "x.y" and convert it to "x/y"
segments=`echo $ipaddr | cut --delimiter=. --fields=2-3 --output-delimiter=/`
echo /${segments}
For larger Hadoop installations which span multiple racks, it is important to ensure that replicas of data exist on multiple racks. This way, the loss of a switch does not render portions of the data unavailable due to all replicas being underneath it.
HDFS can be made rack-aware by the use of a script which allows the master node to map the network topology of the cluster. While alternate configuration strategies can be used, the default implementation allows you to provide an executable script which returns the "rack address" of each of a list of IP addresses.
The network topology script receives as arguments one or more IP addresses of nodes in the cluster. It returns on stdout a list of rack names, one for each input. The input and output order must be consistent.
To set the rack mapping script, specify the key topology.script.file.name in conf/hadoop-site.xml. This provides a command to run to return a rack id; it must be an executable script or program. By default, Hadoop will attempt to send a set of IP addresses to the file as several separate command line arguments. You can control the maximum acceptable number of arguments with the topology.script.number.args key.
Rack ids in Hadoop are hierarchical and look like path names. By default, every node has a rack id of /default-rack. You can set rack ids for nodes to any arbitrary path, e.g., /foo/bar-rack. Path elements further to the left are higher up the tree. Thus a reasonable structure for a large installation may be /top-switch-name/rack-name.
Hadoop rack ids are not currently expressive enough to handle an unusual routing topology such as a 3-d torus; they assume that each node is connected to a single switch which in turn has a single upstream switch. This is not usually a problem, however. Actual packet routing will be directed using the topology discovered by or set in switches and routers. The Hadoop rack ids will be used to find "near" and "far" nodes for replica placement (and in 0.17, MapReduce task placement).
The following example script performs rack identification based on IP addresses given a hierarchical IP addressing scheme enforced by the network administrator. This may work directly for simple installations; more complex network configurations may require a file- or table-based lookup process. Care should be taken in that case to keep the table up-to-date as nodes are physically relocated, etc. This script requires that the maximum number of arguments be set to 1.
#!/bin/bash
# Set rack id based on IP address.
# Assumes network administrator has complete control
# over IP addresses assigned to nodes and they are
# in the 10.x.y.z address space. Assumes that
# IP addresses are distributed hierarchically. e.g.,
# 10.1.y.z is one data center segment and 10.2.y.z is another;
# 10.1.1.z is one rack, 10.1.2.z is another rack in
# the same segment, etc.)
#
# This is invoked with an IP address as its only argument
# get IP address from the input
ipaddr=$0
# select "x.y" and convert it to "x/y"
segments=`echo $ipaddr | cut --delimiter=. --fields=2-3 --output-delimiter=/`
echo /${segments}
Additional HDFS Tasks
Rebalancing Blocks
New nodes can be added to a cluster in a straightforward manner. On the new node, the same Hadoop version and configuration (conf/hadoop-site.xml) as on the rest of the cluster should be installed. Starting the DataNode daemon on the machine will cause it to contact the NameNode and join the cluster. (The new node should be added to the slaves file on the master server as well, to inform the master how to invoke script-based commands on the new node.)
But the new DataNode will have no data on board initially; it is therefore not alleviating space concerns on the existing nodes. New files will be stored on the new DataNode in addition to the existing ones, but for optimum usage, storage should be evenly balanced across all nodes.
This can be achieved with the automatic balancer tool included with Hadoop. The Balancer class will intelligently balance blocks across the nodes to achieve an even distribution of blocks within a given threshold, expressed as a percentage. (The default is 10%.) Smaller percentages make nodes more evenly balanced, but may require more time to achieve this state. Perfect balancing (0%) is unlikely to actually be achieved.
The balancer script can be run by starting bin/start-balancer.sh in the Hadoop directory. The script can be provided a balancing threshold percentage with the -threshold parameter; e.g., bin/start-balancer.sh -threshold 5. The balancer will automatically terminate when it achieves its goal, or when an error occurs, or it cannot find more candidate blocks to move to achieve better balance. The balancer can always be terminated safely by the administrator by running bin/stop-balancer.sh.
The balancing script can be run either when nobody else is using the cluster (e.g., overnight), but can also be run in an "online" fashion while many other jobs are on-going. To prevent the rebalancing process from consuming large amounts of bandwidth and significantly degrading the performance of other processes on the cluster, the dfs.balance.bandwidthPerSec configuration parameter can be used to limit the number of bytes/sec each node may devote to rebalancing its data store.
Copying Large Sets of Files
When migrating a large number of files from one location to another (either from one HDFS cluster to another, from S3 into HDFS or vice versa, etc), the task should be divided between multiple nodes to allow them all to share in the bandwidth required for the process. Hadoop includes a tool called distcp for this purpose.
By invoking bin/hadoop distcp src dest, Hadoop will start a MapReduce task to distribute the burden of copying a large number of files from src to dest. These two parameters may specify a full URL for the the path to copy. e.g., "hdfs://SomeNameNode:9000/foo/bar/" and "hdfs://OtherNameNode:2000/baz/quux/" will copy the children of /foo/bar on one cluster to the directory tree rooted at /baz/quux on the other. The paths are assumed to be directories, and are copied recursively. S3 URLs can be specified with s3://bucket-name/key.
Decommissioning Nodes
In addition to allowing nodes to be added to the cluster on the fly, nodes can also be removed from a cluster while it is running, without data loss. But if nodes are simply shut down "hard," data loss may occur as they may hold the sole copy of one or more file blocks.
Nodes must be retired on a schedule that allows HDFS to ensure that no blocks are entirely replicated within the to-be-retired set of DataNodes.
HDFS provides a decommissioning feature which ensures that this process is performed safely. To use it, follow the steps below:
Step 1: Cluster configuration. If it is assumed that nodes may be retired in your cluster, then before it is started, an excludes file must be configured. Add a key named dfs.hosts.exclude to your conf/hadoop-site.xml file. The value associated with this key provides the full path to a file on the NameNode's local file system which contains a list of machines which are not permitted to connect to HDFS.
Step 2: Determine hosts to decommission. Each machine to be decommissioned should be added to the file identified by dfs.hosts.exclude, one per line. This will prevent them from connecting to the NameNode.
Step 3: Force configuration reload. Run the command bin/hadoop dfsadmin -refreshNodes. This will force the NameNode to reread its configuration, including the newly-updated excludes file. It will decommission the nodes over a period of time, allowing time for each node's blocks to be replicated onto machines which are scheduled to remain active.
Step 4: Shutdown nodes. After the decommission process has completed, the decommissioned hardware can be safely shutdown for maintenance, etc. The bin/hadoop dfsadmin -report command will describe which nodes are connected to the cluster.
Step 5: Edit excludes file again. Once the machines have been decommissioned, they can be removed from the excludes file. Running bin/hadoop dfsadmin -refreshNodes again will read the excludes file back into the NameNode, allowing the DataNodes to rejoin the cluster after maintenance has been completed, or additional capacity is needed in the cluster again, etc.
Verifying File System Health
After decommissioning nodes, restarting a cluster, or periodically during its lifetime, you may want to ensure that the file system is healthy--that files are not corrupted or under-replicated, and that blocks are not missing.
Hadoop provides an fsck command to do exactly this. It can be launched at the command line like so:
bin/hadoop fsck [path] [options]
If run with no arguments, it will print usage information and exit. If run with the argument /, it will check the health of the entire file system and print a report. If provided with a path to a particular directory or file, it will only check files under that path. If an option argument is given but no path, it will start from the file system root (/). The options may include two different types of options:
Action options specify what action should be taken when corrupted files are found. This can be -move, which moves corrupt files to /lost+found, or -delete, which deletes corrupted files.
Information options specify how verbose the tool should be in its report. The -files option will list all files it checks as it encounters them. This information can be further expanded by adding the -blocks option, which prints the list of blocks for each file. Adding -locations to these two options will then print the addresses of the DataNodes holding these blocks. Still more information can be retrieved by adding -racks to the end of this list, which then prints the rack topology information for each location. (See the next subsection for more information on configuring network rack awareness.) Note that the later options do not imply the former; you must use them in conjunction with one another. Also, note that the Hadoop program uses -files in a "common argument parser" shared by the different commands such as dfsadmin, fsck, dfs, etc. This means that if you omit a path argument to fsck, it will not receive the -files option that you intend. You can separate common options from fsck-specific options by using -- as an argument, like so:
bin/hadoop fsck -- -files -blocks
The -- is not required if you provide a path to start the check from, or if you specify another argument first such as -move.
By default, fsck will not operate on files still open for write by another client. A list of such files can be produced with the -openforwrite option.
New nodes can be added to a cluster in a straightforward manner. On the new node, the same Hadoop version and configuration (conf/hadoop-site.xml) as on the rest of the cluster should be installed. Starting the DataNode daemon on the machine will cause it to contact the NameNode and join the cluster. (The new node should be added to the slaves file on the master server as well, to inform the master how to invoke script-based commands on the new node.)
But the new DataNode will have no data on board initially; it is therefore not alleviating space concerns on the existing nodes. New files will be stored on the new DataNode in addition to the existing ones, but for optimum usage, storage should be evenly balanced across all nodes.
This can be achieved with the automatic balancer tool included with Hadoop. The Balancer class will intelligently balance blocks across the nodes to achieve an even distribution of blocks within a given threshold, expressed as a percentage. (The default is 10%.) Smaller percentages make nodes more evenly balanced, but may require more time to achieve this state. Perfect balancing (0%) is unlikely to actually be achieved.
The balancer script can be run by starting bin/start-balancer.sh in the Hadoop directory. The script can be provided a balancing threshold percentage with the -threshold parameter; e.g., bin/start-balancer.sh -threshold 5. The balancer will automatically terminate when it achieves its goal, or when an error occurs, or it cannot find more candidate blocks to move to achieve better balance. The balancer can always be terminated safely by the administrator by running bin/stop-balancer.sh.
The balancing script can be run either when nobody else is using the cluster (e.g., overnight), but can also be run in an "online" fashion while many other jobs are on-going. To prevent the rebalancing process from consuming large amounts of bandwidth and significantly degrading the performance of other processes on the cluster, the dfs.balance.bandwidthPerSec configuration parameter can be used to limit the number of bytes/sec each node may devote to rebalancing its data store.
Copying Large Sets of Files
When migrating a large number of files from one location to another (either from one HDFS cluster to another, from S3 into HDFS or vice versa, etc), the task should be divided between multiple nodes to allow them all to share in the bandwidth required for the process. Hadoop includes a tool called distcp for this purpose.
By invoking bin/hadoop distcp src dest, Hadoop will start a MapReduce task to distribute the burden of copying a large number of files from src to dest. These two parameters may specify a full URL for the the path to copy. e.g., "hdfs://SomeNameNode:9000/foo/bar/" and "hdfs://OtherNameNode:2000/baz/quux/" will copy the children of /foo/bar on one cluster to the directory tree rooted at /baz/quux on the other. The paths are assumed to be directories, and are copied recursively. S3 URLs can be specified with s3://bucket-name/key.
Decommissioning Nodes
In addition to allowing nodes to be added to the cluster on the fly, nodes can also be removed from a cluster while it is running, without data loss. But if nodes are simply shut down "hard," data loss may occur as they may hold the sole copy of one or more file blocks.
Nodes must be retired on a schedule that allows HDFS to ensure that no blocks are entirely replicated within the to-be-retired set of DataNodes.
HDFS provides a decommissioning feature which ensures that this process is performed safely. To use it, follow the steps below:
Step 1: Cluster configuration. If it is assumed that nodes may be retired in your cluster, then before it is started, an excludes file must be configured. Add a key named dfs.hosts.exclude to your conf/hadoop-site.xml file. The value associated with this key provides the full path to a file on the NameNode's local file system which contains a list of machines which are not permitted to connect to HDFS.
Step 2: Determine hosts to decommission. Each machine to be decommissioned should be added to the file identified by dfs.hosts.exclude, one per line. This will prevent them from connecting to the NameNode.
Step 3: Force configuration reload. Run the command bin/hadoop dfsadmin -refreshNodes. This will force the NameNode to reread its configuration, including the newly-updated excludes file. It will decommission the nodes over a period of time, allowing time for each node's blocks to be replicated onto machines which are scheduled to remain active.
Step 4: Shutdown nodes. After the decommission process has completed, the decommissioned hardware can be safely shutdown for maintenance, etc. The bin/hadoop dfsadmin -report command will describe which nodes are connected to the cluster.
Step 5: Edit excludes file again. Once the machines have been decommissioned, they can be removed from the excludes file. Running bin/hadoop dfsadmin -refreshNodes again will read the excludes file back into the NameNode, allowing the DataNodes to rejoin the cluster after maintenance has been completed, or additional capacity is needed in the cluster again, etc.
Verifying File System Health
After decommissioning nodes, restarting a cluster, or periodically during its lifetime, you may want to ensure that the file system is healthy--that files are not corrupted or under-replicated, and that blocks are not missing.
Hadoop provides an fsck command to do exactly this. It can be launched at the command line like so:
bin/hadoop fsck [path] [options]
If run with no arguments, it will print usage information and exit. If run with the argument /, it will check the health of the entire file system and print a report. If provided with a path to a particular directory or file, it will only check files under that path. If an option argument is given but no path, it will start from the file system root (/). The options may include two different types of options:
Action options specify what action should be taken when corrupted files are found. This can be -move, which moves corrupt files to /lost+found, or -delete, which deletes corrupted files.
Information options specify how verbose the tool should be in its report. The -files option will list all files it checks as it encounters them. This information can be further expanded by adding the -blocks option, which prints the list of blocks for each file. Adding -locations to these two options will then print the addresses of the DataNodes holding these blocks. Still more information can be retrieved by adding -racks to the end of this list, which then prints the rack topology information for each location. (See the next subsection for more information on configuring network rack awareness.) Note that the later options do not imply the former; you must use them in conjunction with one another. Also, note that the Hadoop program uses -files in a "common argument parser" shared by the different commands such as dfsadmin, fsck, dfs, etc. This means that if you omit a path argument to fsck, it will not receive the -files option that you intend. You can separate common options from fsck-specific options by using -- as an argument, like so:
bin/hadoop fsck -- -files -blocks
The -- is not required if you provide a path to start the check from, or if you specify another argument first such as -move.
By default, fsck will not operate on files still open for write by another client. A list of such files can be produced with the -openforwrite option.
HDFS Permissions and Security
Starting with Hadoop 0.16.1, HDFS has included a rudimentary file permissions system. This permission system is based on the POSIX model, but does not provide strong security for HDFS files. The HDFS permissions system is designed to prevent accidental corruption of data or casual misuse of information within a group of users who share access to a cluster. It is not a strong security model that guarantees denial of access to unauthorized parties.
HDFS security is based on the POSIX model of users and groups. Each file or directory has 3 permissions (read, write and execute) associated with it at three different granularities: the file's owner, users in the same group as the owner, and all other users in the system. As the HDFS does not provide the full POSIX spectrum of activity, some combinations of bits will be meaningless. For example, no file can be executed; the +x bits cannot be set on files (only directories). Nor can an existing file be written to, although the +w bits may still be set.
Security permissions and ownership can be modified using the bin/hadoop dfs -chmod, -chown, and -chgrp operations described earlier in this document; they work in a similar fashion to the POSIX/Linux tools of the same name.
Determining identity - Identity is not authenticated formally with HDFS; it is taken from an extrinsic source. The Hadoop system is programmed to use the user's current login as their Hadoop username (i.e., the equivalent of whoami). The user's current working group list (i.e, the output of groups) is used as the group list in Hadoop. HDFS itself does not verify that this username is genuine to the actual operator.
Superuser status - The username which was used to start the Hadoop process (i.e., the username who actually ran bin/start-all.sh or bin/start-dfs.sh) is acknowledged to be the superuser for HDFS. If this user interacts with HDFS, he does so with a special username superuser. This user's operations on HDFS never fail, regardless of permission bits set on the particular files he manipulates. If Hadoop is shutdown and restarted under a different username, that username is then bound to the superuser account.
Supergroup - There is also a special group named supergroup, whose membership is controlled by the configuration parameter dfs.permissions.supergroup.
Disabling permissions - By default, permissions are enabled on HDFS. The permission system can be disabled by setting the configuration option dfs.permissions to false. The owner, group, and permissions bits associated with each file and directory will still be preserved, but the HDFS process does not enforce them, except when using permissions-related operations such as -chmod.
HDFS security is based on the POSIX model of users and groups. Each file or directory has 3 permissions (read, write and execute) associated with it at three different granularities: the file's owner, users in the same group as the owner, and all other users in the system. As the HDFS does not provide the full POSIX spectrum of activity, some combinations of bits will be meaningless. For example, no file can be executed; the +x bits cannot be set on files (only directories). Nor can an existing file be written to, although the +w bits may still be set.
Security permissions and ownership can be modified using the bin/hadoop dfs -chmod, -chown, and -chgrp operations described earlier in this document; they work in a similar fashion to the POSIX/Linux tools of the same name.
Determining identity - Identity is not authenticated formally with HDFS; it is taken from an extrinsic source. The Hadoop system is programmed to use the user's current login as their Hadoop username (i.e., the equivalent of whoami). The user's current working group list (i.e, the output of groups) is used as the group list in Hadoop. HDFS itself does not verify that this username is genuine to the actual operator.
Superuser status - The username which was used to start the Hadoop process (i.e., the username who actually ran bin/start-all.sh or bin/start-dfs.sh) is acknowledged to be the superuser for HDFS. If this user interacts with HDFS, he does so with a special username superuser. This user's operations on HDFS never fail, regardless of permission bits set on the particular files he manipulates. If Hadoop is shutdown and restarted under a different username, that username is then bound to the superuser account.
Supergroup - There is also a special group named supergroup, whose membership is controlled by the configuration parameter dfs.permissions.supergroup.
Disabling permissions - By default, permissions are enabled on HDFS. The permission system can be disabled by setting the configuration option dfs.permissions to false. The owner, group, and permissions bits associated with each file and directory will still be preserved, but the HDFS process does not enforce them, except when using permissions-related operations such as -chmod.
Using HDFS Programmatically
While HDFS can be manipulated explicitly through user commands, or implicitly as the input to or output from a Hadoop MapReduce job, you can also work with HDFS inside your own Java applications. (A JNI-based wrapper, libhdfs also provides this functionality in C/C++ programs.)
This section provides a short tutorial on using the Java-based HDFS API. It will be based on the following code listing:
1: import java.io.File;
2: import java.io.IOException;
3:
4: import org.apache.hadoop.conf.Configuration;
5: import org.apache.hadoop.fs.FileSystem;
6: import org.apache.hadoop.fs.FSDataInputStream;
7: import org.apache.hadoop.fs.FSDataOutputStream;
8: import org.apache.hadoop.fs.Path;
9:
10: public class HDFSHelloWorld {
11:
12: public static final String theFilename = "hello.txt";
13: public static final String message = "Hello, world!\n";
14:
15: public static void main (String [] args) throws IOException {
16:
17: Configuration conf = new Configuration();
18: FileSystem fs = FileSystem.get(conf);
19:
20: Path filenamePath = new Path(theFilename);
21:
22: try {
23: if (fs.exists(filenamePath)) {
24: // remove the file first
25: fs.delete(filenamePath);
26: }
27:
28: FSDataOutputStream out = fs.create(filenamePath);
29: out.writeUTF(message;
30: out.close();
31:
32: FSDataInputStream in = fs.open(filenamePath);
33: String messageIn = in.readUTF();
34: System.out.print(messageIn);
35: in.close();
46: } catch (IOException ioe) {
47: System.err.println("IOException during operation: " + ioe.toString());
48: System.exit(1);
49: }
40: }
41: }
This program creates a file named hello.txt, writes a short message into it, then reads it back and prints it to the screen. If the file already existed, it is deleted first.
First we get a handle to an abstract FileSystem object, as specified by the application configuration. The Configuration object created uses the default parameters.
17: Configuration conf = new Configuration();
18: FileSystem fs = FileSystem.get(conf);
The FileSystem interface actually provides a generic abstraction suitable for use in several file systems. Depending on the Hadoop configuration, this may use HDFS or the local file system or a different one altogether. If this test program is launched via the ordinary 'java classname' command line, it may not find conf/hadoop-site.xml and will use the local file system. To ensure that it uses the proper Hadoop configuration, launch this program through Hadoop by putting it in a jar and running:
$HADOOP_HOME/bin/hadoop jar yourjar HDFSHelloWorld
Regardless of how you launch the program and which file system it connects to, writing to a file is done in the same way:
28: FSDataOutputStream out = fs.create(filenamePath);
29: out.writeUTF(message);
30: out.close();
First we create the file with the fs.create() call, which returns an FSDataOutputStream used to write data into the file. We then write the information using ordinary stream writing functions; FSDataOutputStream extends the java.io.DataOutputStream class. When we are done with the file, we close the stream with out.close().
This call to fs.create() will overwrite the file if it already exists, but for sake of example, this program explicitly removes the file first anyway (note that depending on this explicit prior removal is technically a race condition). Testing for whether a file exists and removing an existing file are performed by lines 23-26:
23: if (fs.exists(filenamePath)) {
24: // remove the file first
25: fs.delete(filenamePath);
26: }
Other operations such as copying, moving, and renaming are equally straightforward operations on Path objects performed by the FileSystem.
Finally, we re-open the file for read, and pull the bytes from the file, converting them to a UTF-8 encoded string in the process, and print to the screen:
32: FSDataInputStream in = fs.open(filenamePath);
33: String messageIn = in.readUTF();
34: System.out.print(messageIn);
35: in.close();
The fs.open() method returns an FSDataInputStream, which subclasses java.io.DataInputStream. Data can be read from the stream using the readUTF() operation, as on line 33. When we are done with the stream, we call close() to free the handle associated with the file.
More information:
Complete JavaDoc for the HDFS API is provided at http://hadoop.apache.org/common/docs/r0.20.2/api/index.html.
A direct link to the FileSystem interface is: http://hadoop.apache.org/common/docs/r0.20.2/api/org/apache/hadoop/fs/FileSystem.html.
Another example HDFS application is available on the Hadoop wiki. This implements a file copy operation.
This section provides a short tutorial on using the Java-based HDFS API. It will be based on the following code listing:
1: import java.io.File;
2: import java.io.IOException;
3:
4: import org.apache.hadoop.conf.Configuration;
5: import org.apache.hadoop.fs.FileSystem;
6: import org.apache.hadoop.fs.FSDataInputStream;
7: import org.apache.hadoop.fs.FSDataOutputStream;
8: import org.apache.hadoop.fs.Path;
9:
10: public class HDFSHelloWorld {
11:
12: public static final String theFilename = "hello.txt";
13: public static final String message = "Hello, world!\n";
14:
15: public static void main (String [] args) throws IOException {
16:
17: Configuration conf = new Configuration();
18: FileSystem fs = FileSystem.get(conf);
19:
20: Path filenamePath = new Path(theFilename);
21:
22: try {
23: if (fs.exists(filenamePath)) {
24: // remove the file first
25: fs.delete(filenamePath);
26: }
27:
28: FSDataOutputStream out = fs.create(filenamePath);
29: out.writeUTF(message;
30: out.close();
31:
32: FSDataInputStream in = fs.open(filenamePath);
33: String messageIn = in.readUTF();
34: System.out.print(messageIn);
35: in.close();
46: } catch (IOException ioe) {
47: System.err.println("IOException during operation: " + ioe.toString());
48: System.exit(1);
49: }
40: }
41: }
This program creates a file named hello.txt, writes a short message into it, then reads it back and prints it to the screen. If the file already existed, it is deleted first.
First we get a handle to an abstract FileSystem object, as specified by the application configuration. The Configuration object created uses the default parameters.
17: Configuration conf = new Configuration();
18: FileSystem fs = FileSystem.get(conf);
The FileSystem interface actually provides a generic abstraction suitable for use in several file systems. Depending on the Hadoop configuration, this may use HDFS or the local file system or a different one altogether. If this test program is launched via the ordinary 'java classname' command line, it may not find conf/hadoop-site.xml and will use the local file system. To ensure that it uses the proper Hadoop configuration, launch this program through Hadoop by putting it in a jar and running:
$HADOOP_HOME/bin/hadoop jar yourjar HDFSHelloWorld
Regardless of how you launch the program and which file system it connects to, writing to a file is done in the same way:
28: FSDataOutputStream out = fs.create(filenamePath);
29: out.writeUTF(message);
30: out.close();
First we create the file with the fs.create() call, which returns an FSDataOutputStream used to write data into the file. We then write the information using ordinary stream writing functions; FSDataOutputStream extends the java.io.DataOutputStream class. When we are done with the file, we close the stream with out.close().
This call to fs.create() will overwrite the file if it already exists, but for sake of example, this program explicitly removes the file first anyway (note that depending on this explicit prior removal is technically a race condition). Testing for whether a file exists and removing an existing file are performed by lines 23-26:
23: if (fs.exists(filenamePath)) {
24: // remove the file first
25: fs.delete(filenamePath);
26: }
Other operations such as copying, moving, and renaming are equally straightforward operations on Path objects performed by the FileSystem.
Finally, we re-open the file for read, and pull the bytes from the file, converting them to a UTF-8 encoded string in the process, and print to the screen:
32: FSDataInputStream in = fs.open(filenamePath);
33: String messageIn = in.readUTF();
34: System.out.print(messageIn);
35: in.close();
The fs.open() method returns an FSDataInputStream, which subclasses java.io.DataInputStream. Data can be read from the stream using the readUTF() operation, as on line 33. When we are done with the stream, we call close() to free the handle associated with the file.
More information:
Complete JavaDoc for the HDFS API is provided at http://hadoop.apache.org/common/docs/r0.20.2/api/index.html.
A direct link to the FileSystem interface is: http://hadoop.apache.org/common/docs/r0.20.2/api/org/apache/hadoop/fs/FileSystem.html.
Another example HDFS application is available on the Hadoop wiki. This implements a file copy operation.
HDFS Command Reference
There are many more commands in bin/hadoop dfs than were demonstrated here, although these basic operations will get you started. Running bin/hadoop dfs with no additional arguments will list all commands which can be run with the FsShell system. Furthermore, bin/hadoop dfs -help commandName will display a short usage summary for the operation in question, if you are stuck.
A table of all operations is reproduced below. The following conventions are used for parameters:
* italics denote variables to be filled out by the user.
* "path" means any file or directory name.
* "path..." means one or more file or directory names.
* "file" means any filename.
*
* "src" and "dest" are path names in a directed operation.
* "localSrc" and "localDest" are paths as above, but on the local file system. All other file and path names refer to objects inside HDFS.
* Parameters in [brackets] are optional.


DFSAdmin Command Reference
While the dfs module for bin/hadoop provides common file and directory manipulation commands, they all work with objects within the file system. The dfsadmin module manipulates or queries the file system as a whole. The operation of the commands in this module is described in this section.
Getting overall status: A brief status report for HDFS can be retrieved with bin/hadoop dfsadmin -report. This returns basic information about the overall health of the HDFS cluster, as well as some per-server metrics.
More involved status: If you need to know more details about what the state of the NameNode's metadata is, the command bin/hadoop dfsadmin -metasave filename will record this information in filename. The metasave command will enumerate lists of blocks which are under-replicated, in the process of being replicated, and scheduled for deletion. NB: The help for this command states that it "saves NameNode's primary data structures," but this is a misnomer; the NameNode's state cannot be restored from this information. However, it will provide good information about how the NameNode is managing HDFS's blocks.
Safemode: Safemode is an HDFS state in which the file system is mounted read-only; no replication is performed, nor can files be created or deleted. This is automatically entered as the NameNode starts, to allow all DataNodes time to check in with the NameNode and announce which blocks they hold, before the NameNode determines which blocks are under-replicated, etc. The NameNode waits until a specific percentage of the blocks are present and accounted-for; this is controlled in the configuration by the dfs.safemode.threshold.pct parameter. After this threshold is met, safemode is automatically exited, and HDFS allows normal operations. The bin/hadoop dfsadmin -safemode what command allows the user to manipulate safemode based on the value of what, described below:
* enter - Enters safemode
* leave - Forces the NameNode to exit safemode
* get - Returns a string indicating whether safemode is ON or OFF
* wait - Waits until safemode has exited and returns
Changing HDFS membership - When decommissioning nodes, it is important to disconnect nodes from HDFS gradually to ensure that data is not lost. See the section on decommissioning later in this document for an explanation of the use of the -refreshNodes dfsadmin command.
Upgrading HDFS versions - When upgrading from one version of Hadoop to the next, the file formats used by the NameNode and DataNodes may change. When you first start the new version of Hadoop on the cluster, you need to tell Hadoop to change the HDFS version (or else it will not mount), using the command: bin/start-dfs.sh -upgrade. It will then begin upgrading the HDFS version. The status of an ongoing upgrade operation can be queried with the bin/hadoop dfsadmin -upgradeProgress status command. More verbose information can be retrieved with bin/hadoop dfsadmin -upgradeProgress details. If the upgrade is blocked and you would like to force it to continue, use the command: bin/hadoop dfsadmin -upgradeProgress force. (Note: be sure you know what you are doing if you use this last command.)
When HDFS is upgraded, Hadoop retains backup information allowing you to downgrade to the original HDFS version in case you need to revert Hadoop versions. To back out the changes, stop the cluster, re-install the older version of Hadoop, and then use the command: bin/start-dfs.sh -rollback. It will restore the previous HDFS state.
Only one such archival copy can be kept at a time. Thus, after a few days of operation with the new version (when it is deemed stable), the archival copy can be removed with the command bin/hadoop dfsadmin -finalizeUpgrade. The rollback command cannot be issued after this point. This must be performed before a second Hadoop upgrade is allowed.
Getting help - As with the dfs module, typing bin/hadoop dfsadmin -help cmd will provide more usage information about the particular command.
A table of all operations is reproduced below. The following conventions are used for parameters:
* italics denote variables to be filled out by the user.
* "path" means any file or directory name.
* "path..." means one or more file or directory names.
* "file" means any filename.
*
* "src" and "dest" are path names in a directed operation.
* "localSrc" and "localDest" are paths as above, but on the local file system. All other file and path names refer to objects inside HDFS.
* Parameters in [brackets] are optional.


DFSAdmin Command Reference
While the dfs module for bin/hadoop provides common file and directory manipulation commands, they all work with objects within the file system. The dfsadmin module manipulates or queries the file system as a whole. The operation of the commands in this module is described in this section.
Getting overall status: A brief status report for HDFS can be retrieved with bin/hadoop dfsadmin -report. This returns basic information about the overall health of the HDFS cluster, as well as some per-server metrics.
More involved status: If you need to know more details about what the state of the NameNode's metadata is, the command bin/hadoop dfsadmin -metasave filename will record this information in filename. The metasave command will enumerate lists of blocks which are under-replicated, in the process of being replicated, and scheduled for deletion. NB: The help for this command states that it "saves NameNode's primary data structures," but this is a misnomer; the NameNode's state cannot be restored from this information. However, it will provide good information about how the NameNode is managing HDFS's blocks.
Safemode: Safemode is an HDFS state in which the file system is mounted read-only; no replication is performed, nor can files be created or deleted. This is automatically entered as the NameNode starts, to allow all DataNodes time to check in with the NameNode and announce which blocks they hold, before the NameNode determines which blocks are under-replicated, etc. The NameNode waits until a specific percentage of the blocks are present and accounted-for; this is controlled in the configuration by the dfs.safemode.threshold.pct parameter. After this threshold is met, safemode is automatically exited, and HDFS allows normal operations. The bin/hadoop dfsadmin -safemode what command allows the user to manipulate safemode based on the value of what, described below:
* enter - Enters safemode
* leave - Forces the NameNode to exit safemode
* get - Returns a string indicating whether safemode is ON or OFF
* wait - Waits until safemode has exited and returns
Changing HDFS membership - When decommissioning nodes, it is important to disconnect nodes from HDFS gradually to ensure that data is not lost. See the section on decommissioning later in this document for an explanation of the use of the -refreshNodes dfsadmin command.
Upgrading HDFS versions - When upgrading from one version of Hadoop to the next, the file formats used by the NameNode and DataNodes may change. When you first start the new version of Hadoop on the cluster, you need to tell Hadoop to change the HDFS version (or else it will not mount), using the command: bin/start-dfs.sh -upgrade. It will then begin upgrading the HDFS version. The status of an ongoing upgrade operation can be queried with the bin/hadoop dfsadmin -upgradeProgress status command. More verbose information can be retrieved with bin/hadoop dfsadmin -upgradeProgress details. If the upgrade is blocked and you would like to force it to continue, use the command: bin/hadoop dfsadmin -upgradeProgress force. (Note: be sure you know what you are doing if you use this last command.)
When HDFS is upgraded, Hadoop retains backup information allowing you to downgrade to the original HDFS version in case you need to revert Hadoop versions. To back out the changes, stop the cluster, re-install the older version of Hadoop, and then use the command: bin/start-dfs.sh -rollback. It will restore the previous HDFS state.
Only one such archival copy can be kept at a time. Thus, after a few days of operation with the new version (when it is deemed stable), the archival copy can be removed with the command bin/hadoop dfsadmin -finalizeUpgrade. The rollback command cannot be issued after this point. This must be performed before a second Hadoop upgrade is allowed.
Getting help - As with the dfs module, typing bin/hadoop dfsadmin -help cmd will provide more usage information about the particular command.
Starting HDFS
Now we must format the file system that we just configured:
user@namenode:hadoop$ bin/hadoop namenode -format
This process should only be performed once. When it is complete, we are free to start the distributed file system:
user@namenode:hadoop$ bin/start-dfs.sh
This command will start the NameNode server on the master machine (which is where the start-dfs.sh script was invoked). It will also start the DataNode instances on each of the slave machines. In a single-machine "cluster," this is the same machine as the NameNode instance. On a real cluster of two or more machines, this script will ssh into each slave machine and start a DataNode instance.
user@namenode:hadoop$ bin/hadoop namenode -format
This process should only be performed once. When it is complete, we are free to start the distributed file system:
user@namenode:hadoop$ bin/start-dfs.sh
This command will start the NameNode server on the master machine (which is where the start-dfs.sh script was invoked). It will also start the DataNode instances on each of the slave machines. In a single-machine "cluster," this is the same machine as the NameNode instance. On a real cluster of two or more machines, this script will ssh into each slave machine and start a DataNode instance.
Configuring HDFS
The HDFS for your cluster can be configured in a very short amount of time. First we will fill out the relevant sections of the Hadoop configuration file, then format the NameNode.
Cluster configuration
These instructions for cluster configuration assume that you have already downloaded and unzipped a copy of Hadoop. Module 3 discusses getting started with Hadoop for this tutorial. Module 7 discusses how to set up a larger cluster and provides preliminary setup instructions for Hadoop, including downloading prerequisite software.
The HDFS configuration is located in a set of XML files in the Hadoop configuration directory; conf/ under the main Hadoop install directory (where you unzipped Hadoop to). The conf/hadoop-defaults.xml file contains default values for every parameter in Hadoop. This file is considered read-only. You override this configuration by setting new values in conf/hadoop-site.xml. This file should be replicated consistently across all machines in the cluster. (It is also possible, though not advisable, to host it on NFS.)
Configuration settings are a set of key-value pairs of the format:
property-name
property-value
Adding the linetrue inside the property body will prevent properties from being overridden by user applications. This is useful for most system-wide configuration options.
The following settings are necessary to configure HDFS:
These settings are described individually below:
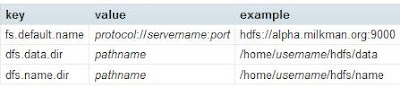
These settings are described individually below:
fs.default.name - This is the URI (protocol specifier, hostname, and port) that describes the NameNode for the cluster. Each node in the system on which Hadoop is expected to operate needs to know the address of the NameNode. The DataNode instances will register with this NameNode, and make their data available through it. Individual client programs will connect to this address to retrieve the locations of actual file blocks.
dfs.data.dir - This is the path on the local file system in which the DataNode instance should store its data. It is not necessary that all DataNode instances store their data under the same local path prefix, as they will all be on separate machines; it is acceptable that these machines are heterogeneous. However, it will simplify configuration if this directory is standardized throughout the system. By default, Hadoop will place this under /tmp. This is fine for testing purposes, but is an easy way to lose actual data in a production system, and thus must be overridden.
dfs.name.dir - This is the path on the local file system of the NameNode instance where the NameNode metadata is stored. It is only used by the NameNode instance to find its information, and does not exist on the DataNodes. The caveat above about /tmp applies to this as well; this setting must be overridden in a production system.
Another configuration parameter, not listed above, is dfs.replication. This is the default replication factor for each block of data in the file system. For a production cluster, this should usually be left at its default value of 3. (You are free to increase your replication factor, though this may be unnecessary and use more space than is required. Fewer than three replicas impact the high availability of information, and possibly the reliability of its storage.)
The following information can be pasted into the hadoop-site.xml file for a single-node configuration:
fs.default.name
hdfs://your.server.name.com:9000
dfs.data.dir
/home/username/hdfs/data
dfs.name.dir
/home/username/hdfs/name
Of course, your.server.name.com needs to be changed, as does username. Using port 9000 for the NameNode is arbitrary.
After copying this information into your conf/hadoop-site.xml file, copy this to the conf/ directories on all machines in the cluster.
The master node needs to know the addresses of all the machines to use as DataNodes; the startup scripts depend on this. Also in the conf/ directory, edit the file slaves so that it contains a list of fully-qualified hostnames for the slave instances, one host per line. On a multi-node setup, the master node (e.g., localhost) is not usually present in this file.
Then make the directories necessary:
user@EachMachine$ mkdir -p $HOME/hdfs/data
user@namenode$ mkdir -p $HOME/hdfs/name
The user who owns the Hadoop instances will need to have read and write access to each of these directories. It is not necessary for all users to have access to these directories. Set permissions with chmod as appropriate. In a large-scale environment, it is recommended that you create a user named "hadoop" on each node for the express purpose of owning and running Hadoop tasks. For a single individual's machine, it is perfectly acceptable to run Hadoop under your own username. It is not recommended that you run Hadoop as root.
Cluster configuration
These instructions for cluster configuration assume that you have already downloaded and unzipped a copy of Hadoop. Module 3 discusses getting started with Hadoop for this tutorial. Module 7 discusses how to set up a larger cluster and provides preliminary setup instructions for Hadoop, including downloading prerequisite software.
The HDFS configuration is located in a set of XML files in the Hadoop configuration directory; conf/ under the main Hadoop install directory (where you unzipped Hadoop to). The conf/hadoop-defaults.xml file contains default values for every parameter in Hadoop. This file is considered read-only. You override this configuration by setting new values in conf/hadoop-site.xml. This file should be replicated consistently across all machines in the cluster. (It is also possible, though not advisable, to host it on NFS.)
Configuration settings are a set of key-value pairs of the format:
Adding the line
The following settings are necessary to configure HDFS:
These settings are described individually below:

These settings are described individually below:
fs.default.name - This is the URI (protocol specifier, hostname, and port) that describes the NameNode for the cluster. Each node in the system on which Hadoop is expected to operate needs to know the address of the NameNode. The DataNode instances will register with this NameNode, and make their data available through it. Individual client programs will connect to this address to retrieve the locations of actual file blocks.
dfs.data.dir - This is the path on the local file system in which the DataNode instance should store its data. It is not necessary that all DataNode instances store their data under the same local path prefix, as they will all be on separate machines; it is acceptable that these machines are heterogeneous. However, it will simplify configuration if this directory is standardized throughout the system. By default, Hadoop will place this under /tmp. This is fine for testing purposes, but is an easy way to lose actual data in a production system, and thus must be overridden.
dfs.name.dir - This is the path on the local file system of the NameNode instance where the NameNode metadata is stored. It is only used by the NameNode instance to find its information, and does not exist on the DataNodes. The caveat above about /tmp applies to this as well; this setting must be overridden in a production system.
Another configuration parameter, not listed above, is dfs.replication. This is the default replication factor for each block of data in the file system. For a production cluster, this should usually be left at its default value of 3. (You are free to increase your replication factor, though this may be unnecessary and use more space than is required. Fewer than three replicas impact the high availability of information, and possibly the reliability of its storage.)
The following information can be pasted into the hadoop-site.xml file for a single-node configuration:
Of course, your.server.name.com needs to be changed, as does username. Using port 9000 for the NameNode is arbitrary.
After copying this information into your conf/hadoop-site.xml file, copy this to the conf/ directories on all machines in the cluster.
The master node needs to know the addresses of all the machines to use as DataNodes; the startup scripts depend on this. Also in the conf/ directory, edit the file slaves so that it contains a list of fully-qualified hostnames for the slave instances, one host per line. On a multi-node setup, the master node (e.g., localhost) is not usually present in this file.
Then make the directories necessary:
user@EachMachine$ mkdir -p $HOME/hdfs/data
user@namenode$ mkdir -p $HOME/hdfs/name
The user who owns the Hadoop instances will need to have read and write access to each of these directories. It is not necessary for all users to have access to these directories. Set permissions with chmod as appropriate. In a large-scale environment, it is recommended that you create a user named "hadoop" on each node for the express purpose of owning and running Hadoop tasks. For a single individual's machine, it is perfectly acceptable to run Hadoop under your own username. It is not recommended that you run Hadoop as root.
HDFS Architecture
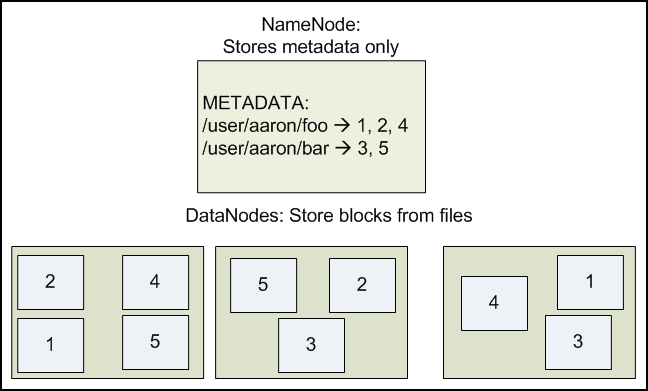
HDFS is a block-structured file system: individual files are broken into blocks of a fixed size. These blocks are stored across a cluster of one or more machines with data storage capacity. Individual machines in the cluster are referred to as DataNodes. A file can be made of several blocks, and they are not necessarily stored on the same machine; the target machines which hold each block are chosen randomly on a block-by-block basis. Thus access to a file may require the cooperation of multiple machines, but supports file sizes far larger than a single-machine DFS; individual files can require more space than a single hard drive could hold.
If several machines must be involved in the serving of a file, then a file could be rendered unavailable by the loss of any one of those machines. HDFS combats this problem by replicating each block across a number of machines (3, by default).

Most block-structured file systems use a block size on the order of 4 or 8 KB. By contrast, the default block size in HDFS is 64MB -- orders of magnitude larger. This allows HDFS to decrease the amount of metadata storage required per file (the list of blocks per file will be smaller as the size of individual blocks increases). Furthermore, it allows for fast streaming reads of data, by keeping large amounts of data sequentially laid out on the disk. The consequence of this decision is that HDFS expects to have very large files, and expects them to be read sequentially. Unlike a file system such as NTFS or EXT, which see many very small files, HDFS expects to store a modest number of very large files: hundreds of megabytes, or gigabytes each. After all, a 100 MB file is not even two full blocks. Files on your computer may also frequently be accessed "randomly," with applications cherry-picking small amounts of information from several different locations in a file which are not sequentially laid out. By contrast, HDFS expects to read a block start-to-finish for a program. This makes it particularly useful to the MapReduce style of programming described in Module 4. That having been said, attempting to use HDFS as a general-purpose distributed file system for a diverse set of applications will be suboptimal.
Because HDFS stores files as a set of large blocks across several machines, these files are not part of the ordinary file system. Typing ls on a machine running a DataNode daemon will display the contents of the ordinary Linux file system being used to host the Hadoop services -- but it will not include any of the files stored inside the HDFS. This is because HDFS runs in a separate namespace, isolated from the contents of your local files. The files inside HDFS (or more accurately: the blocks that make them up) are stored in a particular directory managed by the DataNode service, but the files will named only with block ids. You cannot interact with HDFS-stored files using ordinary Linux file modification tools (e.g., ls, cp, mv, etc). However, HDFS does come with its own utilities for file management, which act very similar to these familiar tools. A later section in this tutorial will introduce you to these commands and their operation.
It is important for this file system to store its metadata reliably. Furthermore, while the file data is accessed in a write once and read many model, the metadata structures (e.g., the names of files and directories) can be modified by a large number of clients concurrently. It is important that this information is never desynchronized. Therefore, it is all handled by a single machine, called the NameNode. The NameNode stores all the metadata for the file system. Because of the relatively low amount of metadata per file (it only tracks file names, permissions, and the locations of each block of each file), all of this information can be stored in the main memory of the NameNode machine, allowing fast access to the metadata.
To open a file, a client contacts the NameNode and retrieves a list of locations for the blocks that comprise the file. These locations identify the DataNodes which hold each block. Clients then read file data directly from the DataNode servers, possibly in parallel. The NameNode is not directly involved in this bulk data transfer, keeping its overhead to a minimum.
Of course, NameNode information must be preserved even if the NameNode machine fails; there are multiple redundant systems that allow the NameNode to preserve the file system's metadata even if the NameNode itself crashes irrecoverably. NameNode failure is more severe for the cluster than DataNode failure. While individual DataNodes may crash and the entire cluster will continue to operate, the loss of the NameNode will render the cluster inaccessible until it is manually restored. Fortunately, as the NameNode's involvement is relatively minimal, the odds of it failing are considerably lower than the odds of an arbitrary DataNode failing at any given point in time.
If several machines must be involved in the serving of a file, then a file could be rendered unavailable by the loss of any one of those machines. HDFS combats this problem by replicating each block across a number of machines (3, by default).
Most block-structured file systems use a block size on the order of 4 or 8 KB. By contrast, the default block size in HDFS is 64MB -- orders of magnitude larger. This allows HDFS to decrease the amount of metadata storage required per file (the list of blocks per file will be smaller as the size of individual blocks increases). Furthermore, it allows for fast streaming reads of data, by keeping large amounts of data sequentially laid out on the disk. The consequence of this decision is that HDFS expects to have very large files, and expects them to be read sequentially. Unlike a file system such as NTFS or EXT, which see many very small files, HDFS expects to store a modest number of very large files: hundreds of megabytes, or gigabytes each. After all, a 100 MB file is not even two full blocks. Files on your computer may also frequently be accessed "randomly," with applications cherry-picking small amounts of information from several different locations in a file which are not sequentially laid out. By contrast, HDFS expects to read a block start-to-finish for a program. This makes it particularly useful to the MapReduce style of programming described in Module 4. That having been said, attempting to use HDFS as a general-purpose distributed file system for a diverse set of applications will be suboptimal.
Because HDFS stores files as a set of large blocks across several machines, these files are not part of the ordinary file system. Typing ls on a machine running a DataNode daemon will display the contents of the ordinary Linux file system being used to host the Hadoop services -- but it will not include any of the files stored inside the HDFS. This is because HDFS runs in a separate namespace, isolated from the contents of your local files. The files inside HDFS (or more accurately: the blocks that make them up) are stored in a particular directory managed by the DataNode service, but the files will named only with block ids. You cannot interact with HDFS-stored files using ordinary Linux file modification tools (e.g., ls, cp, mv, etc). However, HDFS does come with its own utilities for file management, which act very similar to these familiar tools. A later section in this tutorial will introduce you to these commands and their operation.
It is important for this file system to store its metadata reliably. Furthermore, while the file data is accessed in a write once and read many model, the metadata structures (e.g., the names of files and directories) can be modified by a large number of clients concurrently. It is important that this information is never desynchronized. Therefore, it is all handled by a single machine, called the NameNode. The NameNode stores all the metadata for the file system. Because of the relatively low amount of metadata per file (it only tracks file names, permissions, and the locations of each block of each file), all of this information can be stored in the main memory of the NameNode machine, allowing fast access to the metadata.
To open a file, a client contacts the NameNode and retrieves a list of locations for the blocks that comprise the file. These locations identify the DataNodes which hold each block. Clients then read file data directly from the DataNode servers, possibly in parallel. The NameNode is not directly involved in this bulk data transfer, keeping its overhead to a minimum.
Of course, NameNode information must be preserved even if the NameNode machine fails; there are multiple redundant systems that allow the NameNode to preserve the file system's metadata even if the NameNode itself crashes irrecoverably. NameNode failure is more severe for the cluster than DataNode failure. While individual DataNodes may crash and the entire cluster will continue to operate, the loss of the NameNode will render the cluster inaccessible until it is manually restored. Fortunately, as the NameNode's involvement is relatively minimal, the odds of it failing are considerably lower than the odds of an arbitrary DataNode failing at any given point in time.
HDFS Introduction
HDFS, the Hadoop Distributed File System, is a distributed file system designed to hold very large amounts of data (terabytes or even petabytes), and provide high-throughput access to this information. Files are stored in a redundant fashion across multiple machines to ensure their durability to failure and high availability to very parallel applications. This module introduces the design of this distributed file system and instructions on how to operate it.
A distributed file system is designed to hold a large amount of data and provide access to this data to many clients distributed across a network. There are a number of distributed file systems that solve this problem in different ways.
NFS, the Network File System, is the most ubiquitous distributed file system. It is one of the oldest still in use. While its design is straightforward, it is also very constrained. NFS provides remote access to a single logical volume stored on a single machine. An NFS server makes a portion of its local file system visible to external clients. The clients can then mount this remote file system directly into their own Linux file system, and interact with it as though it were part of the local drive.
One of the primary advantages of this model is its transparency. Clients do not need to be particularly aware that they are working on files stored remotely. The existing standard library methods like open(), close(), fread(), etc. will work on files hosted over NFS.
But as a distributed file system, it is limited in its power. The files in an NFS volume all reside on a single machine. This means that it will only store as much information as can be stored in one machine, and does not provide any reliability guarantees if that machine goes down (e.g., by replicating the files to other servers). Finally, as all the data is stored on a single machine, all the clients must go to this machine to retrieve their data. This can overload the server if a large number of clients must be handled. Clients must also always copy the data to their local machines before they can operate on it.
HDFS is designed to be robust to a number of the problems that other DFS's such as NFS are vulnerable to. In particular:
* HDFS is designed to store a very large amount of information (terabytes or petabytes). This requires spreading the data across a large number of machines. It also supports much larger file sizes than NFS.
* HDFS should store data reliably. If individual machines in the cluster malfunction, data should still be available.
* HDFS should provide fast, scalable access to this information. It should be possible to serve a larger number of clients by simply adding more machines to the cluster.
* HDFS should integrate well with Hadoop MapReduce, allowing data to be read and computed upon locally when possible.
But while HDFS is very scalable, its high performance design also restricts it to a particular class of applications; it is not as general-purpose as NFS. There are a large number of additional decisions and trade-offs that were made with HDFS. In particular:
* Applications that use HDFS are assumed to perform long sequential streaming reads from files. HDFS is optimized to provide streaming read performance; this comes at the expense of random seek times to arbitrary positions in files.
* Data will be written to the HDFS once and then read several times; updates to files after they have already been closed are not supported. (An extension to Hadoop will provide support for appending new data to the ends of files; it is scheduled to be included in Hadoop 0.19 but is not available yet.)
* Due to the large size of files, and the sequential nature of reads, the system does not provide a mechanism for local caching of data. The overhead of caching is great enough that data should simply be re-read from HDFS source.
* Individual machines are assumed to fail on a frequent basis, both permanently and intermittently. The cluster must be able to withstand the complete failure of several machines, possibly many happening at the same time (e.g., if a rack fails all together). While performance may degrade proportional to the number of machines lost, the system as a whole should not become overly slow, nor should information be lost. Data replication strategies combat this problem.
The design of HDFS is based on the design of GFS, the Google File System. Its design was described in a paper published by Google.
A distributed file system is designed to hold a large amount of data and provide access to this data to many clients distributed across a network. There are a number of distributed file systems that solve this problem in different ways.
NFS, the Network File System, is the most ubiquitous distributed file system. It is one of the oldest still in use. While its design is straightforward, it is also very constrained. NFS provides remote access to a single logical volume stored on a single machine. An NFS server makes a portion of its local file system visible to external clients. The clients can then mount this remote file system directly into their own Linux file system, and interact with it as though it were part of the local drive.
One of the primary advantages of this model is its transparency. Clients do not need to be particularly aware that they are working on files stored remotely. The existing standard library methods like open(), close(), fread(), etc. will work on files hosted over NFS.
But as a distributed file system, it is limited in its power. The files in an NFS volume all reside on a single machine. This means that it will only store as much information as can be stored in one machine, and does not provide any reliability guarantees if that machine goes down (e.g., by replicating the files to other servers). Finally, as all the data is stored on a single machine, all the clients must go to this machine to retrieve their data. This can overload the server if a large number of clients must be handled. Clients must also always copy the data to their local machines before they can operate on it.
HDFS is designed to be robust to a number of the problems that other DFS's such as NFS are vulnerable to. In particular:
* HDFS is designed to store a very large amount of information (terabytes or petabytes). This requires spreading the data across a large number of machines. It also supports much larger file sizes than NFS.
* HDFS should store data reliably. If individual machines in the cluster malfunction, data should still be available.
* HDFS should provide fast, scalable access to this information. It should be possible to serve a larger number of clients by simply adding more machines to the cluster.
* HDFS should integrate well with Hadoop MapReduce, allowing data to be read and computed upon locally when possible.
But while HDFS is very scalable, its high performance design also restricts it to a particular class of applications; it is not as general-purpose as NFS. There are a large number of additional decisions and trade-offs that were made with HDFS. In particular:
* Applications that use HDFS are assumed to perform long sequential streaming reads from files. HDFS is optimized to provide streaming read performance; this comes at the expense of random seek times to arbitrary positions in files.
* Data will be written to the HDFS once and then read several times; updates to files after they have already been closed are not supported. (An extension to Hadoop will provide support for appending new data to the ends of files; it is scheduled to be included in Hadoop 0.19 but is not available yet.)
* Due to the large size of files, and the sequential nature of reads, the system does not provide a mechanism for local caching of data. The overhead of caching is great enough that data should simply be re-read from HDFS source.
* Individual machines are assumed to fail on a frequent basis, both permanently and intermittently. The cluster must be able to withstand the complete failure of several machines, possibly many happening at the same time (e.g., if a rack fails all together). While performance may degrade proportional to the number of machines lost, the system as a whole should not become overly slow, nor should information be lost. Data replication strategies combat this problem.
The design of HDFS is based on the design of GFS, the Google File System. Its design was described in a paper published by Google.
Subscribe to:
Posts
(
Atom
)